Monday 15. September 2025
17:17:17 UTC+01:00
-
Thomas Zoechling
With Claquette 5.0, we are bringing a major update to our macOS screen recording and video utility.
This release introduces support for macOS 26 Tahoe, adds more versatile recording and exporting options, and extends automation through improved App Intents.
Claquette 5.0 adopts the new Liquid Glass Design introduced in macOS 26 Tahoe.
Liquid Glass Design
Claquette has been updated for macOS 26 Tahoe with full support for the new Liquid Glass Design.
The interface has been refreshed to match the clarity and depth of Tahoe’s system appearance while keeping the familiar workflow that users know.
Flexible Device Configuration
Recording setups are now more versatile.
Claquette 5.0 gives you more control over device combinations — whether you want to capture screen, microphone, system audio, or camera — making it easier to tailor recordings to your specific workflow.
Audio-Only Recording and Exporting
For the first time, Claquette supports standalone audio projects.
You can now record and export audio without video, which makes Claquette useful for voice notes, audio snippets, or capturing system sound in isolation.
Extended App Intents
Claquette’s automation has been strengthened by adopting the newest App Intents framework additions.
We’ve added actions for starting and stopping recordings as well as for audio exports, while making the existing integration more robust.
This allows Claquette to fit more naturally into automated Shortcuts workflows and the new Spotlight features of macOS 26.
For a detailed list of changes, please refer to the
release notes
.
Claquette 5.0 is a free update for all existing users.
Download Claquette 5.0 on the Mac App Store
Thursday 18. July 2024
10:02:36 UTC+01:00
-
Thomas Zoechling
In the vast realm of digital content creation, the ability to manipulate and enhance media has become an essential skill for creators. If you're a Mac user looking to add a touch of professionalism to your GIFs, look no further than Claquette – a powerful app that simplifies the process of cropping and editing GIFs. In this post, we'll explore one of the key features of Claquette and provide a step-by-step guide on how to crop GIFs effortlessly.
Getting Started
To start editing GIFs with Claquette,
download the app
from the Mac App Store. Then open Claquette and get to know the easy-to-use interface. To open the asset you want to crop, either select "File" > "Open" from the main menu or drag the file onto Claquette's Dock icon.
Claquette can import the following asset types:
Video
Animation
Cropping Magic
One of Claquette's standout features is its seamless cropping functionality. To start cropping your assets, choose "Crop" from the "Modify" main menu or simply press the keyboard shortcut Command + K
. This intuitive shortcut opens up a world of possibilities, allowing you to trim and frame your GIFs with precision.
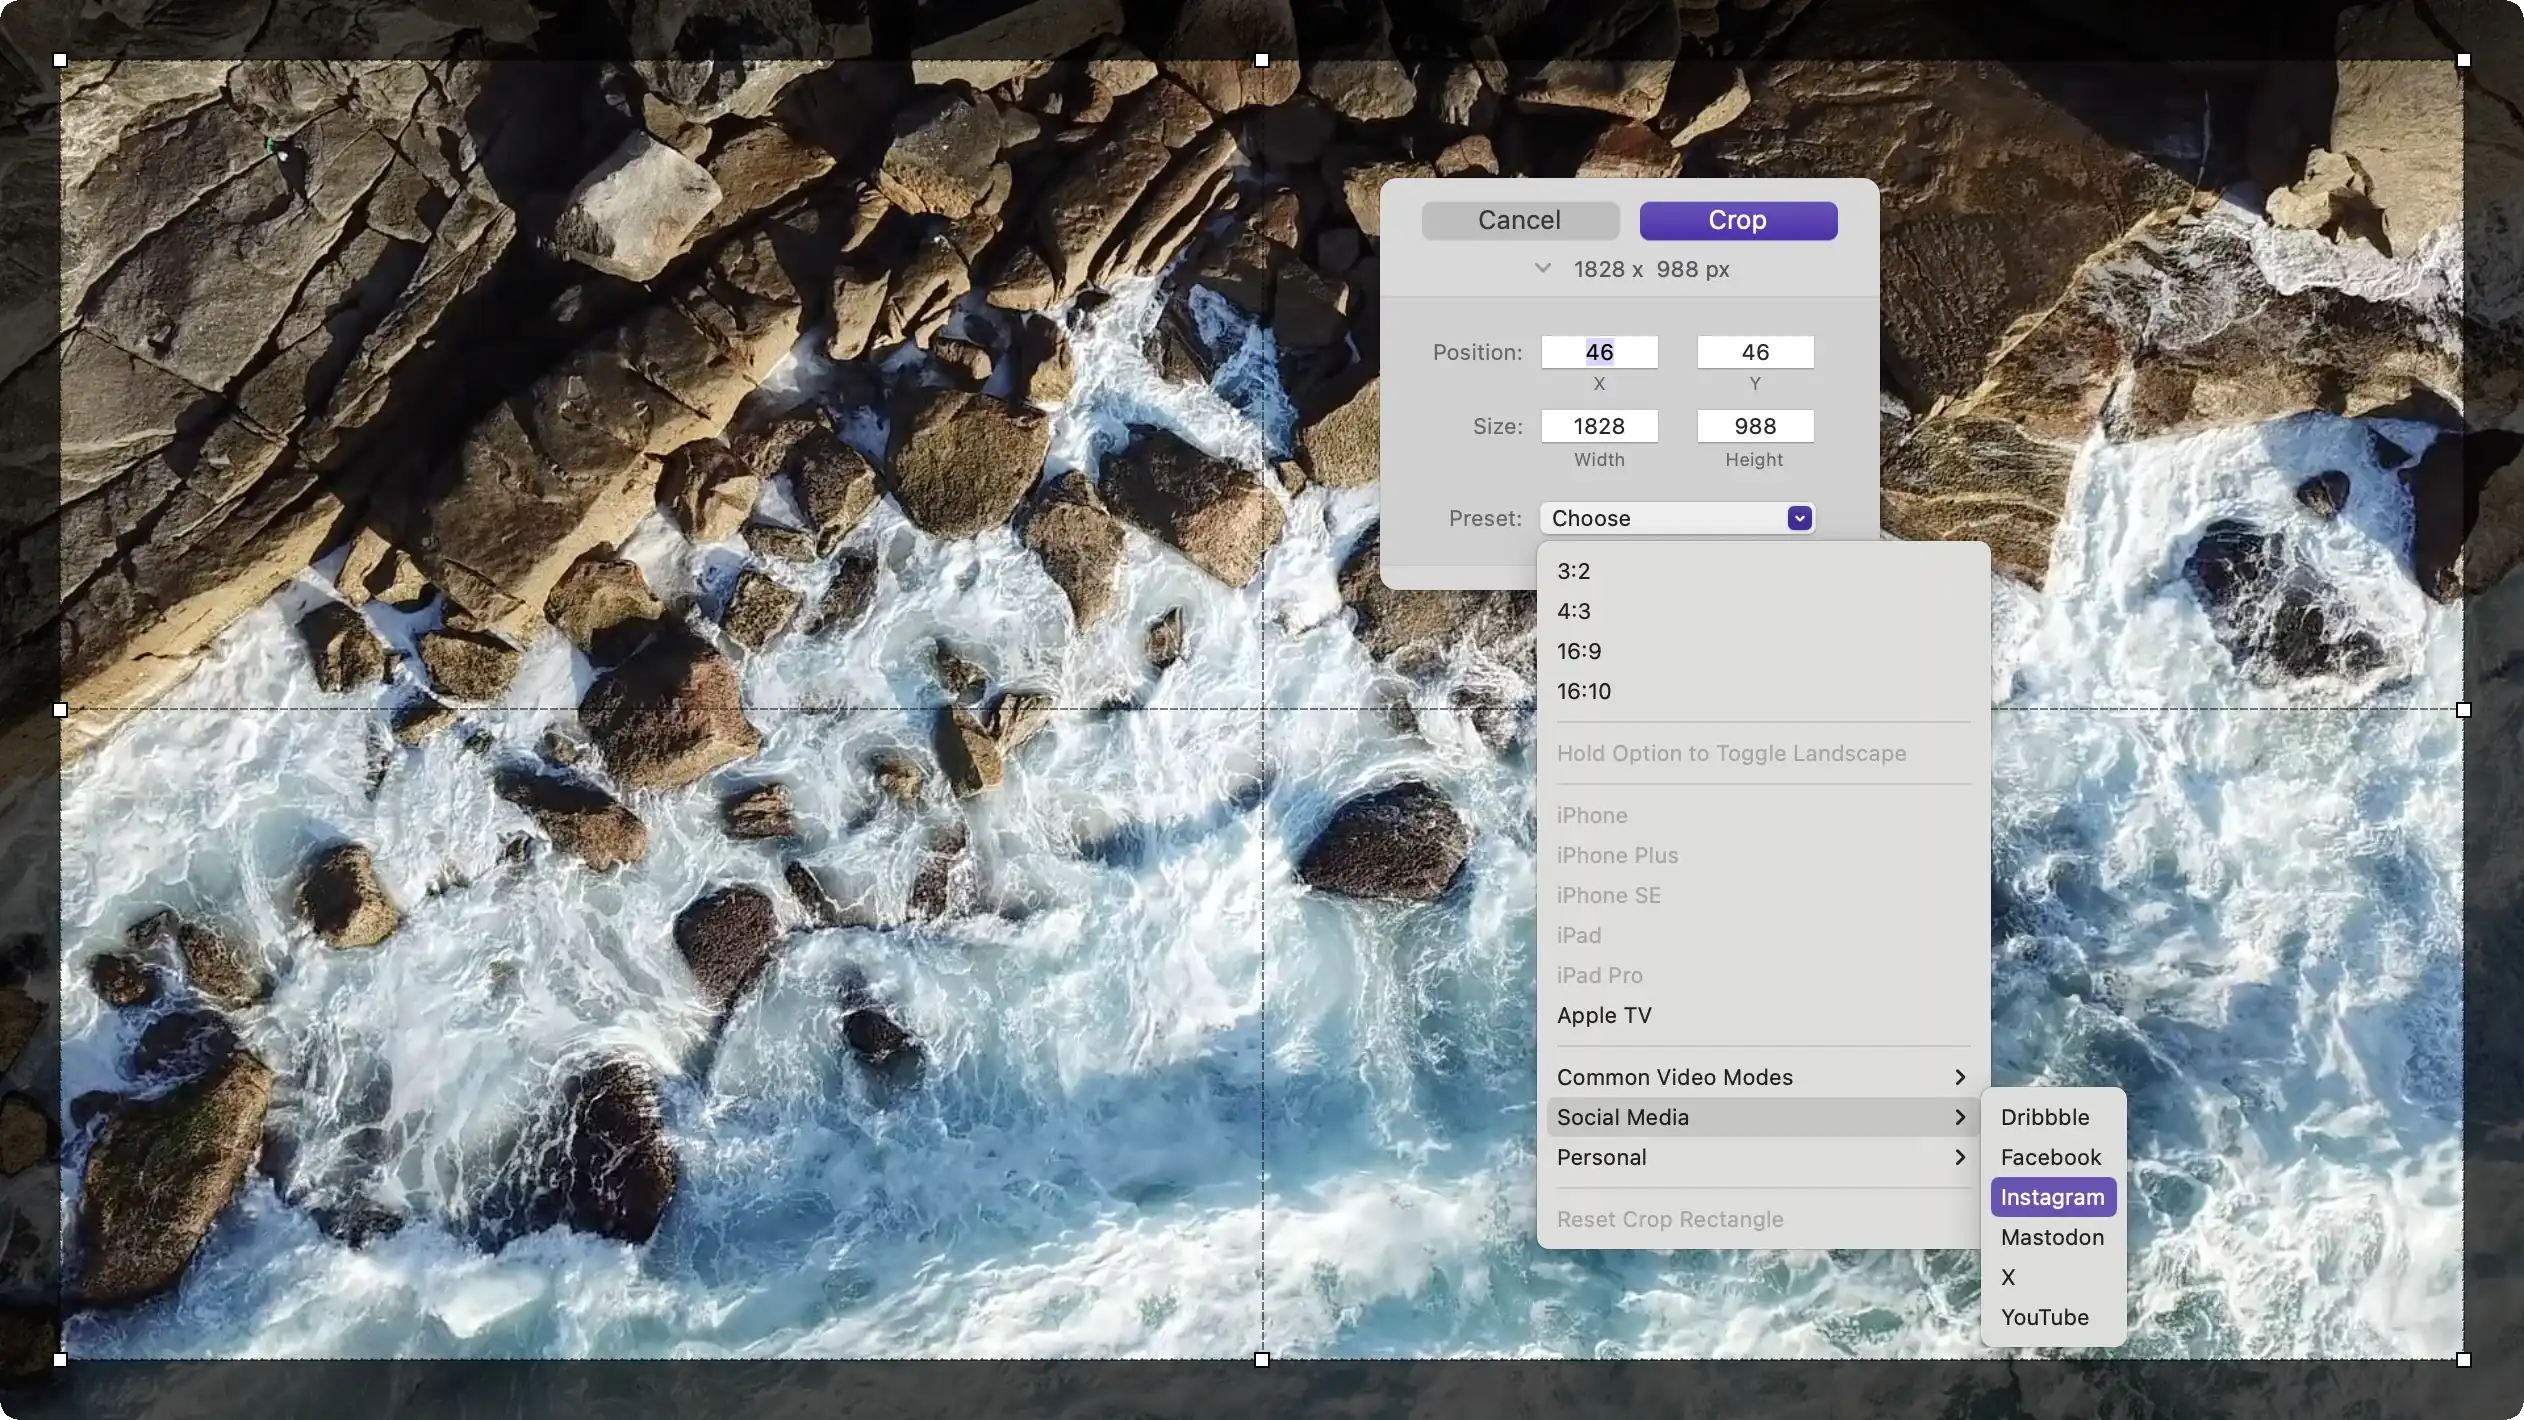
Fine-tune your videos and GIFs with precision using Claquette's crop UI.
Expanding the crop UI reveals precision input text fields for cropping your asset to an exact size. The UI also includes a popup menu with presets for common aspect ratios and social media platforms. These presets are synchronized with your personal export presets. Any export preset you create with a specific size will automatically appear in the "Personal" section of the crop menu.
Social Media Presets
Claquette understands the diverse landscape of social media platforms and simplifies the export process by providing presets tailored to specific platforms. Whether you're creating content for Instagram, YouTube, or another platform, Claquette has you covered. The app streamlines the export process, ensuring your GIFs are optimized for each platform's unique specifications.
Exporting in Style
After you've perfected your GIF, Claquette offers a range of export options to suit your needs. The app supports various formats, including optimized animated GIFs, PNG, and popular video formats like H.264, HEVC, and ProRes. Whether you're sharing your creation on social media or integrating it into a larger video project, Claquette provides the flexibility you need.
Claquette emerges as a valuable tool in the toolkit of any Mac-based content creator. Its intuitive interface, keyboard shortcuts, social media presets, and versatile export options make it a standout choice for those seeking to elevate their GIF editing game. With Claquette, turning your creative vision into polished, shareable content has never been easier.
Download Claquette
today and unlock the full potential of your GIF editing capabilities on your Mac.
Tuesday 26. September 2023
17:07:17 UTC+01:00
-
Thomas Zoechling
We're delighted to introduce Claquette 4.1, bringing some great enhancements to your favorite macOS video and GIF utility.

Claquette 4.1 is fully supported on the newest macOS release (macOS 14 Sonoma).
Here's what's new:
macOS Sonoma Support
Claquette 4.1 smoothly integrates with the latest macOS update, Sonoma, ensuring a seamless user experience and enhanced compatibility. Your creative process just got an upgrade.
New Spotlight Importer
Finding your Claquette projects is now easier than ever with our new Spotlight Importer. Quickly search and locate your GIFs and videos using macOS's built-in search functionality.
Improved Onboarding
When Claquette is running on macOS Sonoma, it occasionally uses TipKit to point out hidden features. TipKit is a system-provided feature for displaying small overlay windows, helping you to improve your workflow and getting the most out of the app.
Claquette 4.1 is a free update for existing users and available
in the Mac App Store
.
Monday 26. June 2023
11:44:45 UTC+01:00
-
Thomas Zoechling
If you're a Mac user and you've ever tried to record a video of your screen, you know that it can be a bit tricky to capture everything you want. One of the biggest challenges is recording the system audio – that is, the sound that's coming out of your computer's speakers.
Recording system audio along with on-screen content enhances immersive quality and engagement. Claquette allows you to effortlessly record system audio.
In this article, we will walk you through the steps of capturing system audio using Claquette on your Mac, unlocking new possibilities for your digital creations.
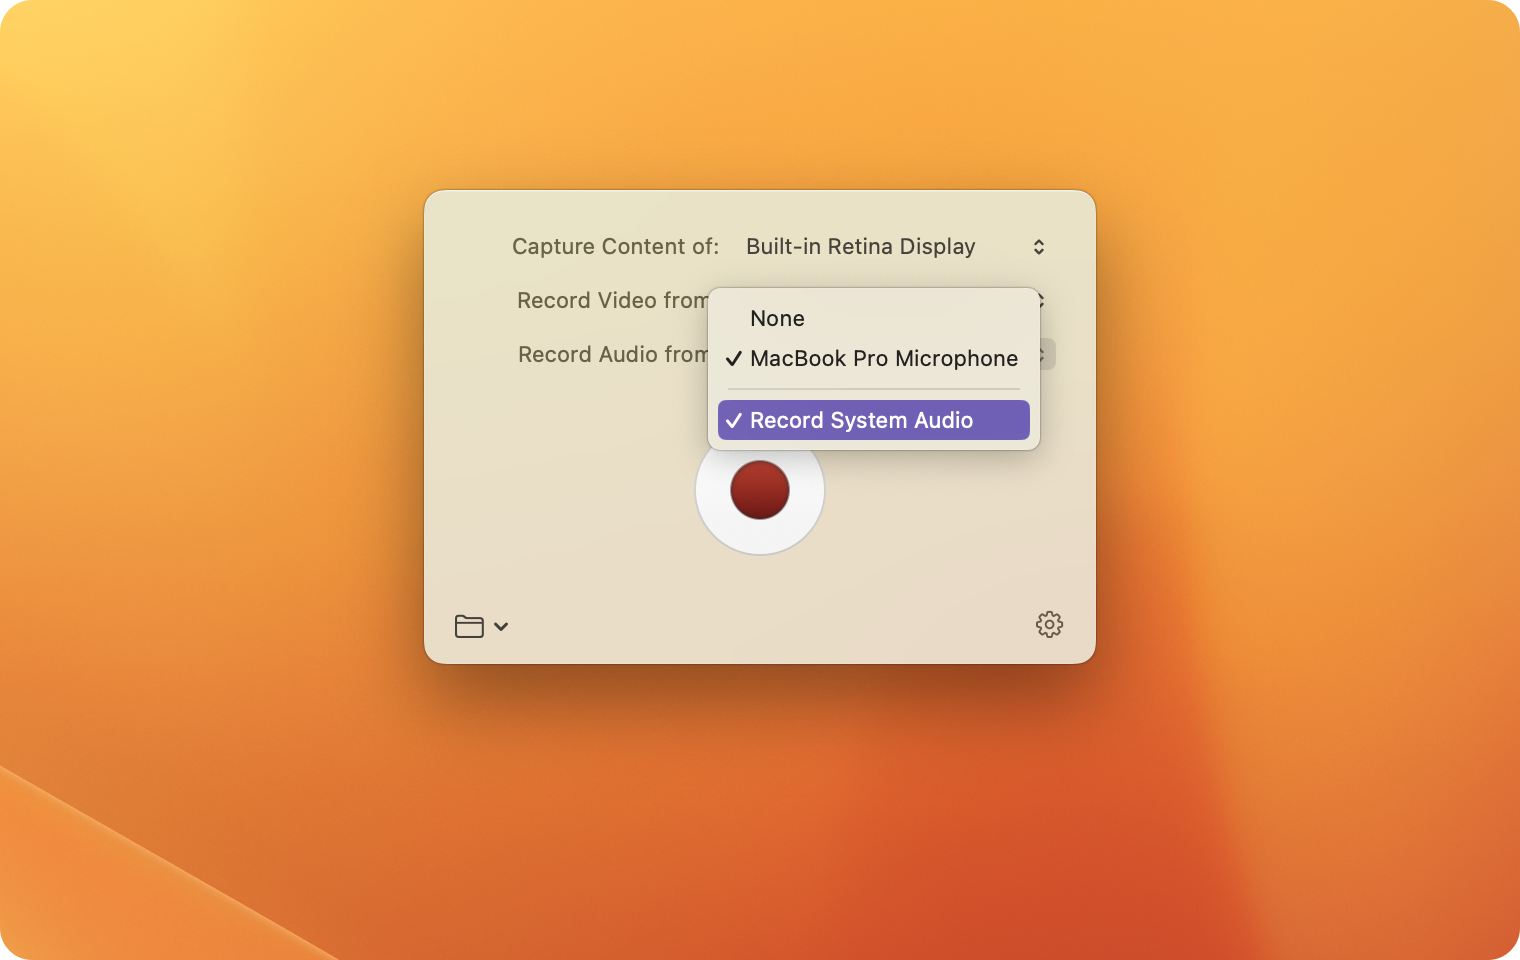
Claquette allows you to record the system audio in addition to the microphone sound.
-
Configure Audio Settings
Right after launching Claquette, open the "Record Audio from" popup button and check "Record System Audio".
-
Choose Additional Audio Input Source (Optional)
In the same pop-up menu, you can enable or disable additional audio input sources such as the MacBooks' built-in microphones.
-
Start Recording with System Audio
Click the prominent red record button to start the recording process. Alternatively, you can use a global keyboard shortcut to start recording (default: Shift-Command-2). Claquette will start recording your screen and system audio.
-
Stop Recording and Save Your Creation
When you have finished recording the screen with system audio, use the status item in the upper right corner of the screen to stop recording. Alternatively, you can use the global keyboard shortcut here to stop recording.
-
Export
To share your recording with other people, you need to export it to a video file. Select "Export" from the "File" menu and configure a "Video" export in the sheet shown. Claquette supports export to .mp4 or .mov video files.
Conclusion:
With Claquette, Mac users can effortlessly capture screen recordings with captivating system audio. By following the steps outlined in this guide, you can make your digital creations stand out even more. Let Claquette's intuitive interface and robust features open up new possibilities for recording system audio on your Mac. Immerse your audience in captivating soundscapes with Claquette.
Note:
Claquette only supports system audio recording when running on macOS 13.0 (Ventura) or later.
You can
download Claquette for free
from the Mac App Store.
Monday 24. October 2022
17:07:07 UTC+01:00
-
Thomas Zoechling
The latest Mac operating system, macOS 13 (Ventura), is here and it comes with a lot of video and audio related additions and Claquette supports them from day one.
Claquette 4.0 is a free update for existing users and available
in the Mac App Store
.
Claquette 4.0 takes advantage of the latest audio and video features of macOS Ventura.
The following features are new in Claquette 4.0:
System Audio Recording
The enhancements to macOS Ventura's recording capabilities finally allow us to deliver our most requested feature: system audio recording.
When running on macOS 13, Claquette can now record all audio you hear on your Mac.
The feature can be toggled on the recording screen by selecting "Record System Audio" in the "Record Audio from" pop-up button. No additional setup or additional audio components are required.
Now you can easily record conversations from video conferencing tools like Skype, Slack, or Zoom, or even FaceTime calls when they are accepted on your Mac.
Continuity Camera
Another new feature we're making use of is Continuity Camera. This allows you to use the high-quality camera in your iPhone as an external video input.
If your iPhone is in range and connected to the same Wi-Fi network, you can select it in the "Record Video from" pop-up button. When you start a new recording, the camera image from your iPhone will be included as video overlay in the final recording.
Tweakable Recorder Presets
Claquette now offers several options that allow you to adjust the recorder for your use case. We now offer presets that prioritize "Quality", "Performance" or "Size". For example, you can now switch to "Performance" mode when recording a fast game, or to "Quality" mode when preparing a product demo.
You can also set custom scaling and framerate options and store them in a user defined recording preset.
Monday 25. October 2021
10:12:33 UTC+01:00
-
Thomas Zoechling
macOS Monterey is here and Claquette is prepared.
The new version brings automation support via Shortcuts.app, better system integration and a new video compositor powered by Apple’s Metal.
Claquette 3.0 is a free update for existing users and available
from the Mac App Store
.
Claquette is now fully optimized for the newest version of macOS
Here's a brief rundown of the main new features:
Shortcuts Support
Claquette now comes with a set of actions that allows you to create custom automation workflows in Monterey’s new Shortcuts.app.
Improved System Integration
When saving recordings or movies in our native file format, the Finder now shows beautifully rendered thumbnails and Quick Look previews.
Metal Compositor
To gain all performance benefits of Apple Silicon chips, we re-wrote our video compositor to utilize the Metal GPU API.
You can learn more about all new features and improvements in Claquette 3.0 in the
release notes
.
Monday 03. May 2021
17:02:34 UTC+01:00
-
Thomas Zoechling
The screen recording features of Claquette span a wide range of use cases. You can capture a short clip, convert it to GIF and post it to social media or you can record long form footage to produce a high quality screencast. In this article we'll focus on the latter and show how to leverage the Final Cut Pro X and Motion exporters in the "Pro" version of Claquette.
Preparing your recording
When recording your screen, it's important to consider the display resolution and the aspect ratio of that resolution. For best results, configure your screen in a way that matches the playback environment of your target audience. For example, if you plan to distribute your screencast on YouTube, it's best to record your screen in a resolution with an aspect ratio of 16:9. This is the
standard aspect ratio on YouTube
.
A quick way to find your screen's aspect ratio is the "Display" preference pane in Claquette:
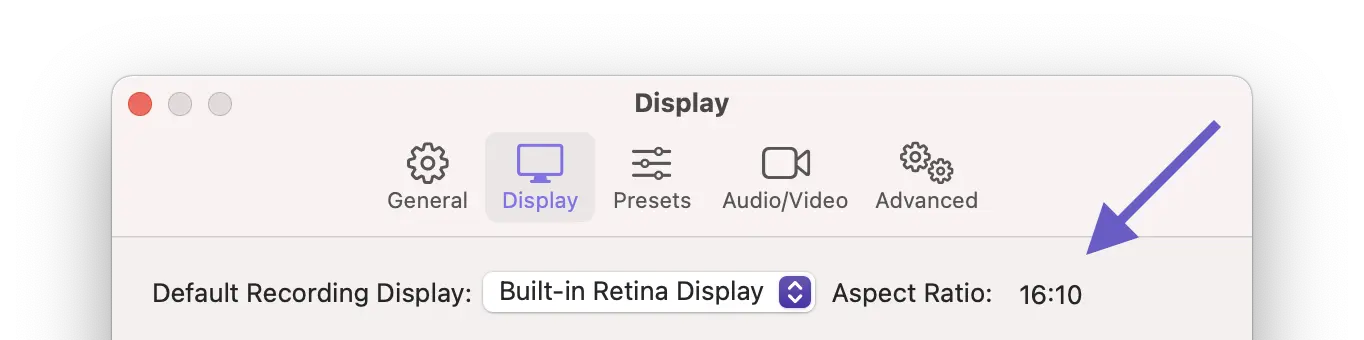
The Claquette display preference pane shows the aspect ratio of the current screen.
If you have a second display connected to your Mac, you can also use the "Display" preference pane to explicitly set this display as recording device. Per default Claquette always records the screen where the cursor currently resides on. This can be useful since a lot of built-in displays in MacBooks have an aspect ratio of 16:10 while many external screens feature an aspect ratio of 16:9. This allows you to choose the one that best suits your needs.
To change the resolution of your recording, you can either use the macOS System Preferences to
globally change the resolution on your system
or use Claquette recording presets. Those presets dynamically resize the incoming frames before appending them to your recording. Presets can be configured on the "Display" preference pane. To select a preset, you can use the "Capture Content of" popup on the recording window.
Things to consider during recording
Claquette always records the full frame of the selected screen and later lets you crop your recording to cut out relevant portions. Additionally, the app also tracks your frontmost window during recording. This tracked information is used to assist you during crop and also when generating Final Cut or Motion projects. When exporting a project, a separate lane for the current frontmost window is created. This lane can be used for various effects. It allows you to zoom the content of that window independently or to create effects by applying filters. For instance, you can apply a "Gaussian Blur" filter to the main screen recording track to focus on the contents of the frontmost window.
It's important to avoid fast movements or fast resizing of windows during recording if you want to work with them later in Final Cut. Filters and effects are working better for windows that stay at the same size and position.
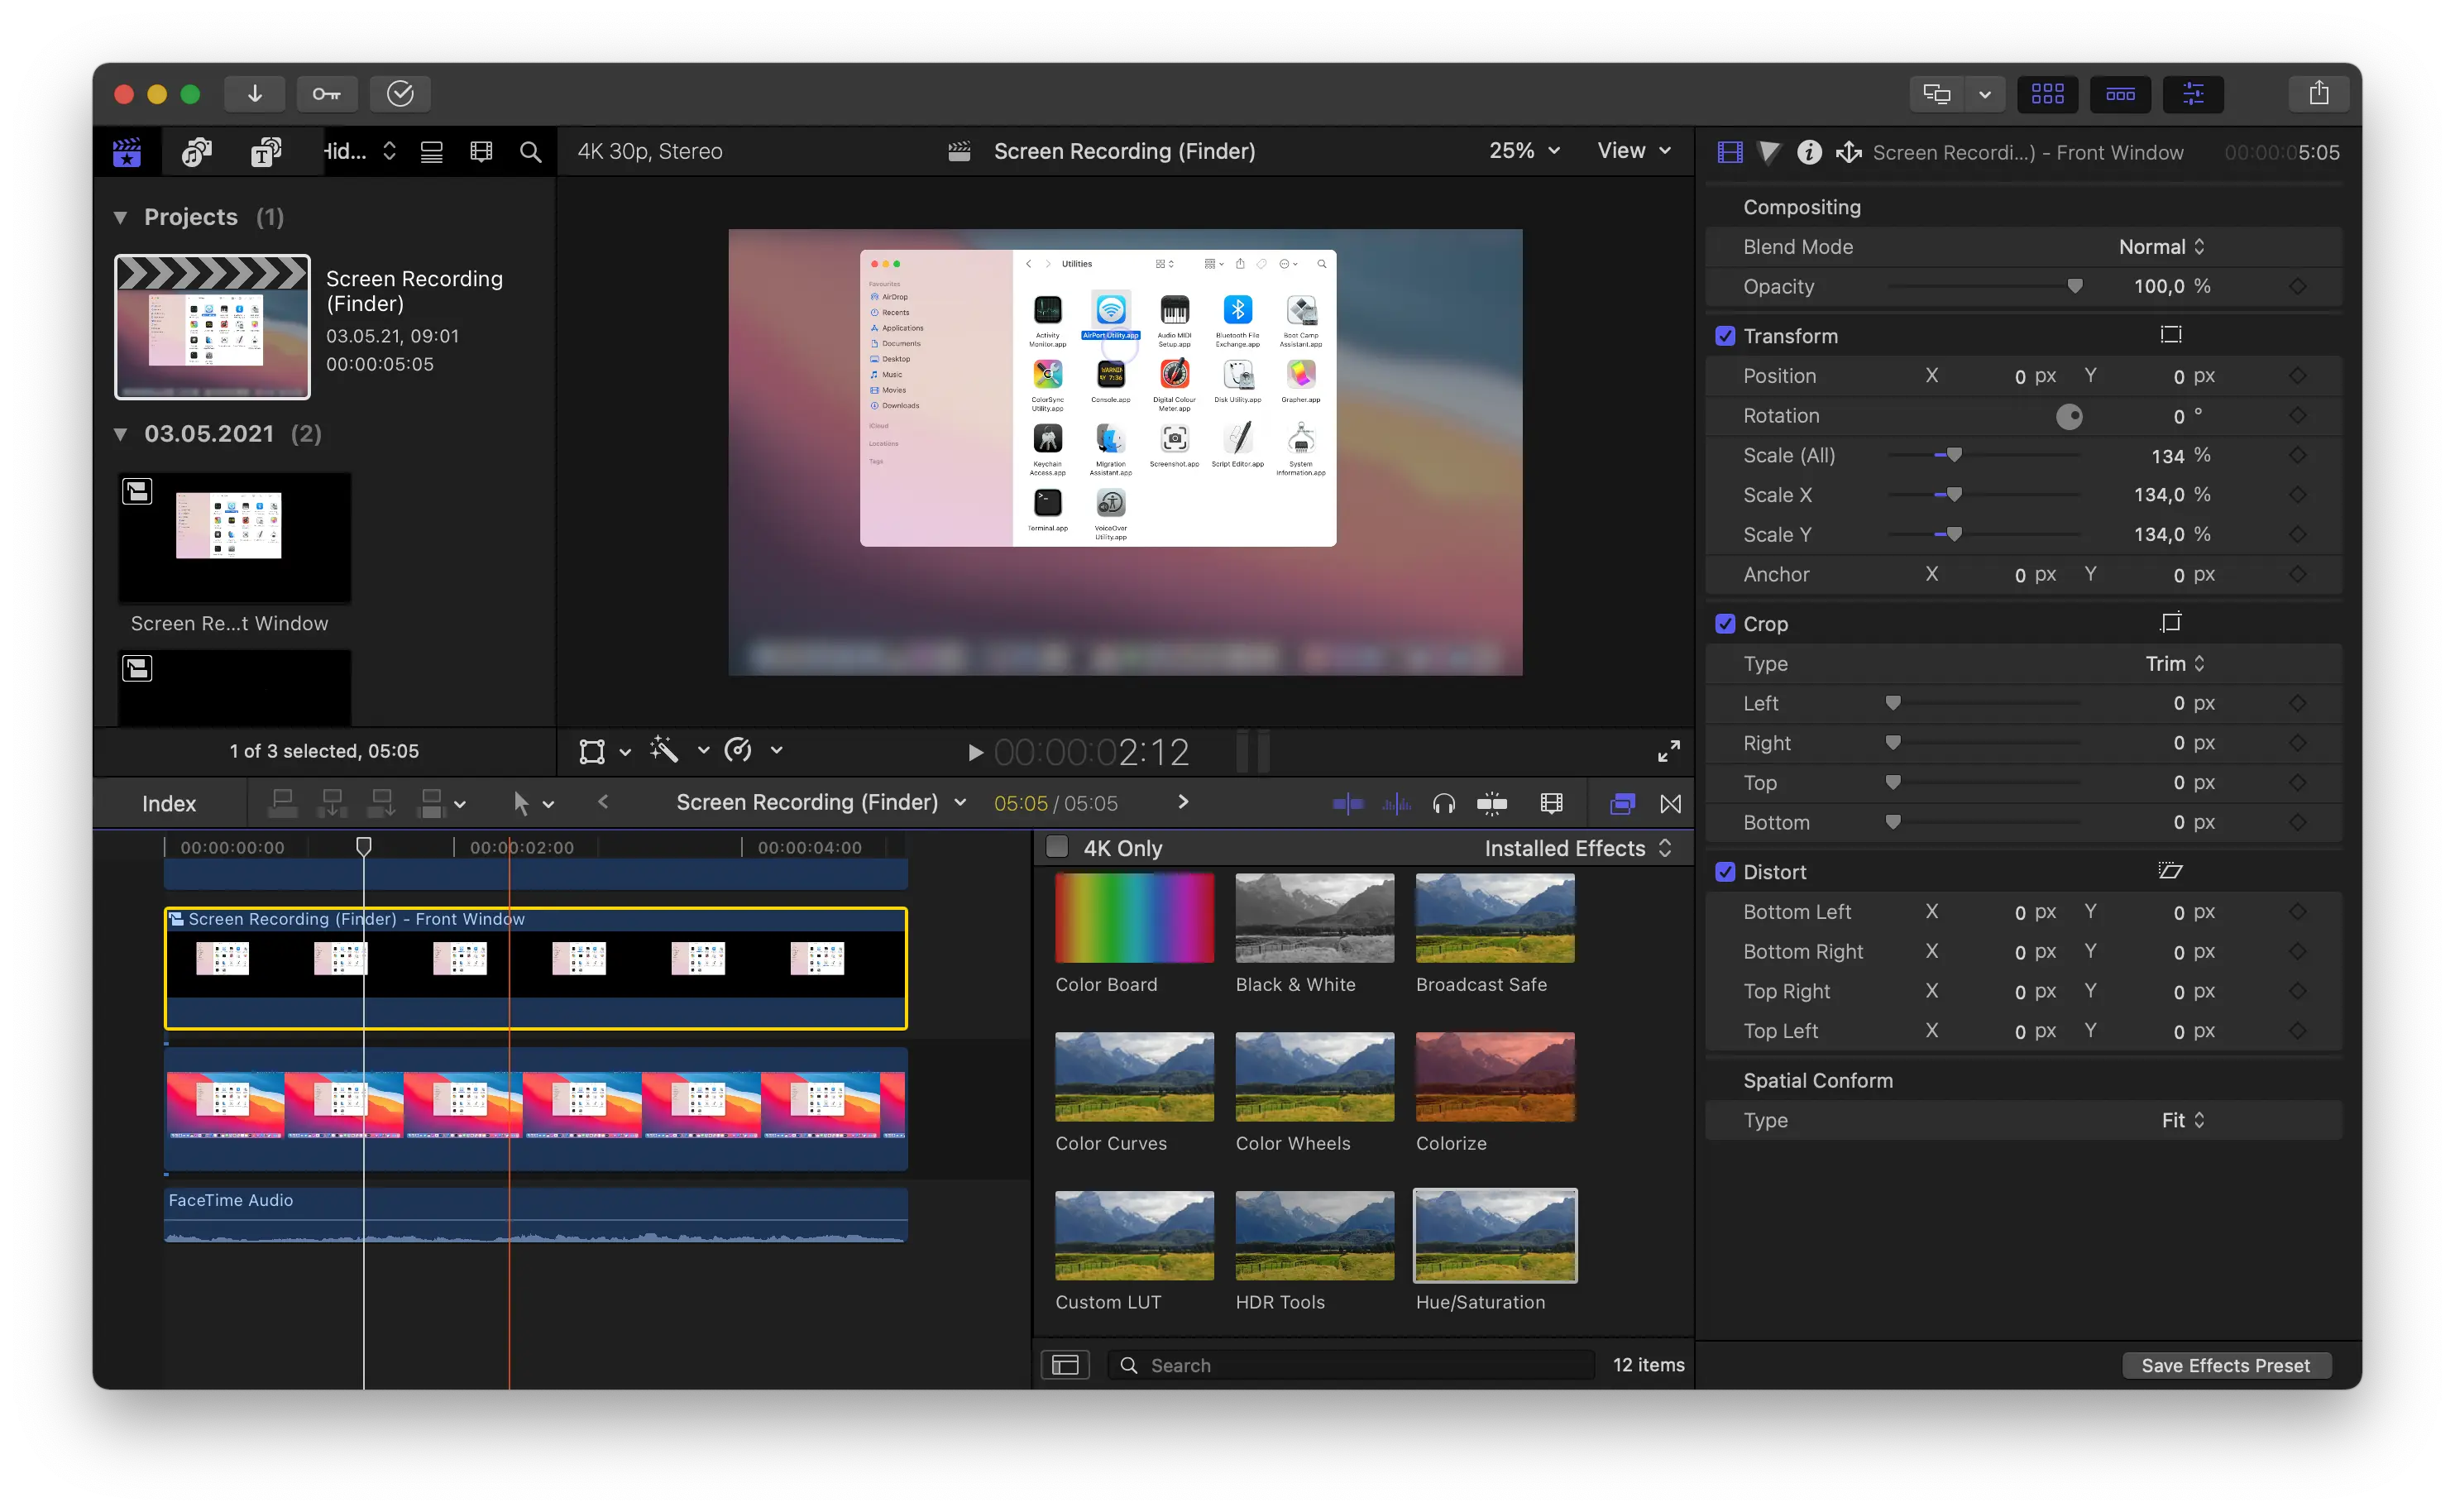
By applying blur and desaturation to the background track, the frontmost window can be highlighted.
Exporting to Final Cut Pro X and Motion
When performing a "Project" export, Claquette uses a high quality ProRes 4444 preset when rendering video assets. Due to the high quality, encoding can take a while. To keep export times short, consider trimming your footage before exporting to Final Cut or Motion. All other aspects of the project are exported in a non-destructive manner. This means that even if you have e.g. a "Crop" applied, the full size asset is exported and the crop is configured as property of the project. This allows you to adjust or remove the crop later when working in Final Cut or Motion.
The export dialog also allows you to choose the click effect for the cursor. The mouse cursor and its click effect are also represented as dedicated tracks in Final Cut and can be changed in various ways. You can zoom, hide or change the displayed cursor images.
The high quality of the recordings and its project export features allow you to integrate Claquette into a Final Cut based workflow. This enables production in a familiar editing environment with many ways to enhance your screencasts.